The scratching in the walls has finally stopped and the pests are gone. But as you survey the scene they left behind, the droppings, the shredded materials, the lingering odor, a new sense of unease can set in. You’re not just disgusted by the mess; you’re worried about the hidden dangers. The task of cleaning after a rodent infestation can feel overwhelming, with the threat of Hantavirus and other diseases turning a simple cleanup into a high-stakes operation. Where do you even begin?
We’re here to eliminate the uncertainty and restore your peace of mind. This comprehensive guide provides the professional, step-by-step method you need to safely and effectively disinfect your home. We’ll walk you through the proven techniques to safeguard your family’s health, eradicate lingering odors, and reclaim your space with confidence. Consider this your actionable checklist for a completely sanitized home, from choosing the right protective gear to knowing when it’s time to call in the professionals.
Safety First: Essential Prep and Gear for Rodent Cleanup
Once rodents have been eliminated from your home, the job is only half done. The most critical phase, cleaning after rodent infestation, requires a professional approach to safeguard your family’s health. The visible mess of droppings and nesting materials is unpleasant, but the real threat lies in the invisible pathogens they leave behind. Rodent urine and feces can carry a host of bacteria and viruses that pose significant health risks.
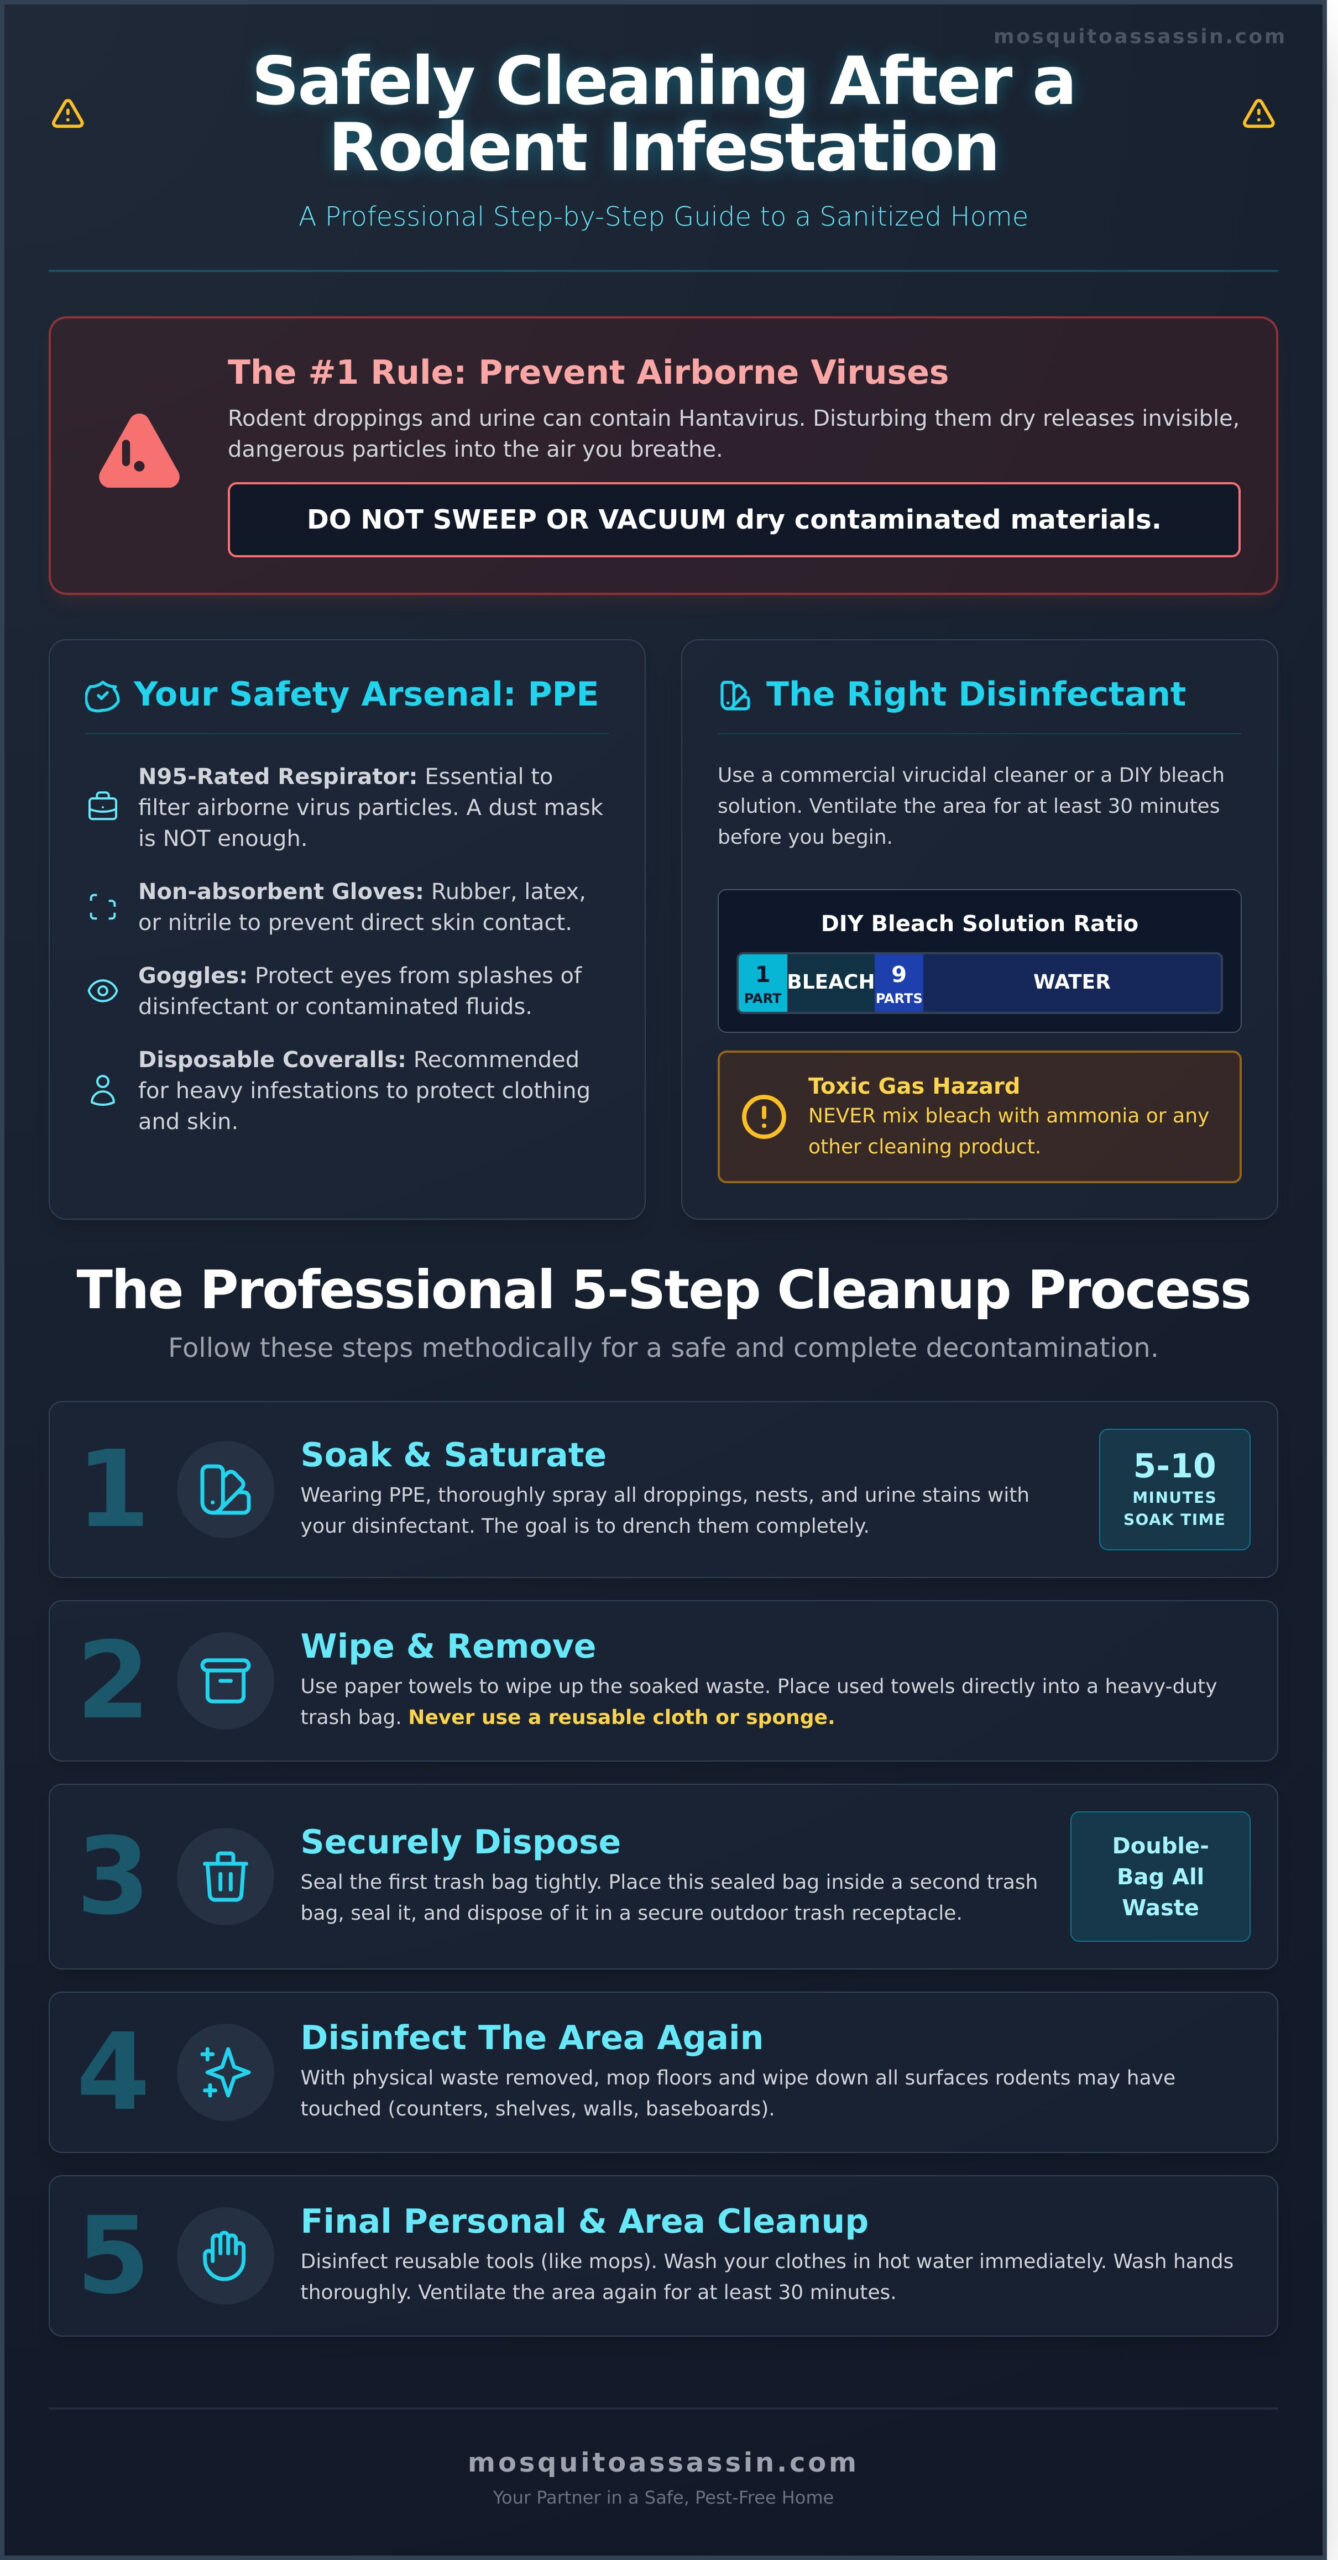
One of the most severe dangers is Hantavirus, a pathogen spread primarily by deer mice. Disturbing dried droppings, urine, or nesting materials can release microscopic virus particles into the air. If inhaled, these particles can cause Hantavirus Pulmonary Syndrome (HPS), a serious and potentially fatal respiratory disease. This is why proper procedure is not just recommended-it’s essential for your safety.
To better understand the core safety protocols, this video provides a helpful overview:
Before you even touch a paper towel, follow these two foundational rules. First, NEVER sweep or vacuum dry droppings. This is the fastest way to aerosolize dangerous viruses, making them breathable. Second, thoroughly ventilate the contaminated area by opening windows and doors for at least 30 minutes before you begin working. This helps disperse any airborne particles.
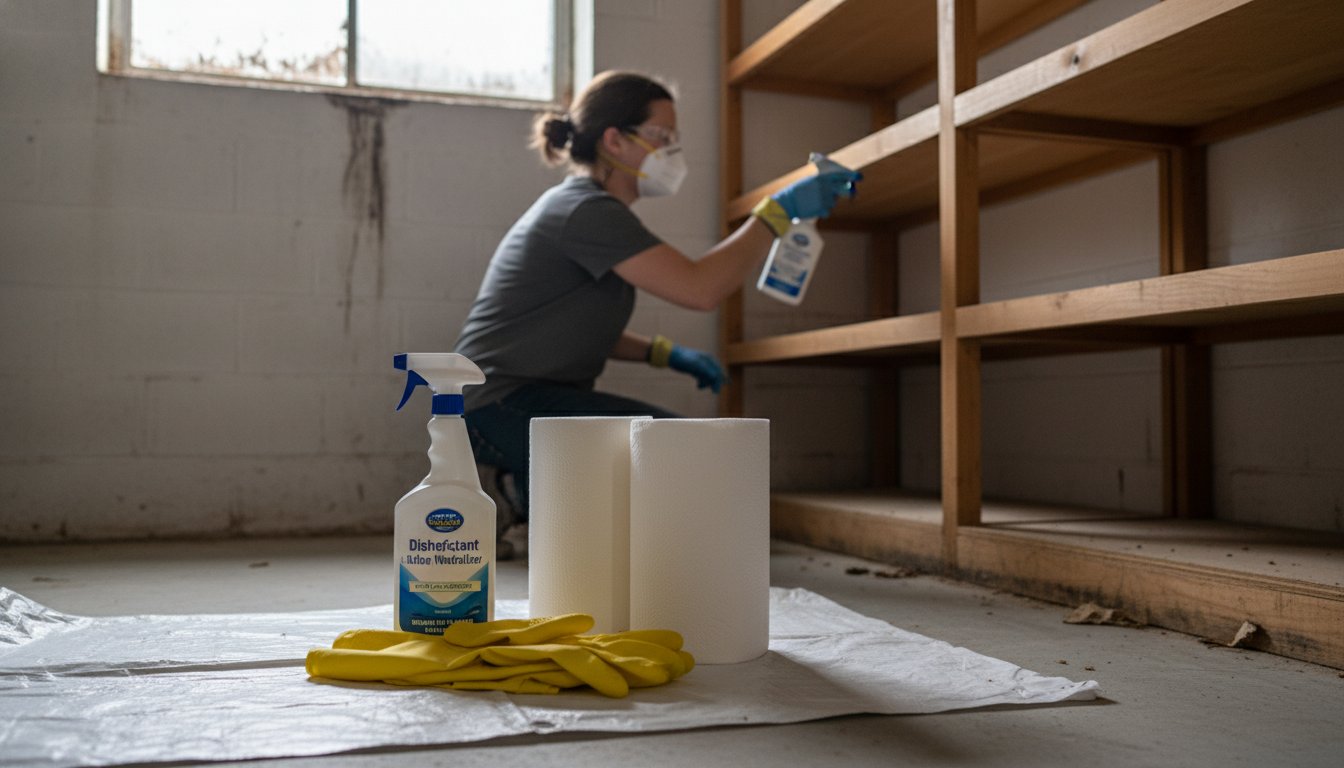
Assembling Your Personal Protective Equipment (PPE)
Protecting yourself is the top priority. Do not attempt a cleanup without the proper gear. Your essential PPE checklist includes:
-
Non-absorbent gloves: Rubber, latex, or nitrile gloves are mandatory to prevent direct contact with contaminants.
-
N95-rated respirator: A standard dust mask is not enough. An N95 mask is designed to filter out the fine airborne particles that can carry viruses.
-
Goggles: Protect your eyes from splashes of cleaning solution or contaminated liquids.
-
Disposable coveralls: For heavy infestations, especially in confined spaces like attics or crawlspaces, coveralls protect your clothing and skin.
Choosing the Right Disinfectant Solution
You need a powerful solution to neutralize the pathogens left behind. Gather your supplies before you enter the area to ensure an efficient and safe process. You will need:
-
A virucidal disinfectant: You can use a commercial product rated to kill viruses or a simple DIY bleach solution. To make your own, mix 1 part household bleach to 9 parts water.
-
Critical Safety Note: Never mix bleach with ammonia or any other cleaning product, as this can create toxic chlorine gas.
-
Supplies: A spray bottle for the disinfectant, paper towels for wiping, and heavy-duty, sealable trash bags for disposal.
The Professional 5-Step Process for Cleaning Rodent Droppings
Once you’ve addressed the source of the infestation, the next critical phase is the cleanup. Simply sweeping or vacuuming is dangerous, as it can send hazardous dust airborne. A methodical, professional approach is essential for safeguarding your home and family from lingering pathogens. This proven 5-step process for cleaning after rodent infestation ensures you eliminate all waste without cross-contamination, neutralizing the serious rodent-borne disease risks that droppings and urine leave behind.
For best results on hard surfaces like floors, counters, and shelves, always work from the top down and from the cleanest areas toward the most heavily contaminated spots. Patience is your most important tool; allow the disinfectant to do its job completely.
Step 1: Soak and Saturate the Contaminated Area
With your personal protective equipment (PPE) securely on, thoroughly spray the visible droppings, urine stains, and nesting materials with your disinfectant or bleach solution. Do not be shy with the spray, the goal is to completely saturate the waste. Let the solution soak for a minimum of 5 to 10 minutes. This crucial waiting period kills viruses and bacteria before you ever touch the waste, drastically reducing the risk of exposure.
Step 2: Wipe Up and Remove the Waste
After the disinfectant has had time to work, use disposable paper towels to wipe up the soaked droppings and urine. Pick up the waste carefully and place the used paper towels directly into a heavy-duty trash bag. Never use a reusable cloth, sponge, or mop for this step, as it creates a high risk of spreading contamination throughout your home.
Step 3: Securely Dispose of All Contaminated Materials
Once you have removed all the physical waste from the area, seal the trash bag tightly. To prevent any potential leaks or tears, immediately place this sealed bag inside a second trash bag and seal that one as well. Dispose of the double-bagged waste in a secure, outdoor trash receptacle with a tight-fitting lid to prevent other pests from accessing it.
Step 4: Disinfect the Entire Area Again
With the physical contaminants gone, it’s time to disinfect the entire area to eliminate any remaining microscopic threats. Mop the floors and use a clean cloth or paper towels to wipe down all surfaces the rodents may have touched, including countertops, shelves, cabinet interiors, and even walls. Pay special attention to corners, baseboards, and known rodent pathways.
Step 5: Final Cleanup and Ventilation
Your job isn’t done until your tools and yourself are also clean. Thoroughly disinfect your mop and any other reusable cleaning tools. Remove the clothes you wore and wash them immediately in hot water. Finally, wash your hands thoroughly with soap and water. Open windows and doors to ventilate the area for at least 30 minutes to air out any lingering disinfectant fumes and ensure fresh, clean air circulates through the space.
How to Clean Contaminated Items and Difficult Spaces
Rodents don’t just travel across floors; they burrow into furniture, nest in fabrics, and contaminate hidden spaces like attics and crawlspaces. A crucial part of cleaning after rodent infestation involves tackling these difficult areas where pathogens can linger. Before you begin, always assess the level of contamination. While many items can be salvaged with the right techniques, heavily soiled materials, especially insulation, often pose a significant health risk and must be discarded.
Clothing, Bedding, and Other Washable Fabrics
Items like clothing, towels, and bedding that have been exposed to rodents require immediate and thorough washing to eliminate bacteria. Follow these proven steps for safe and effective cleaning:
-
Transport Carefully: Place items in a plastic bag to carry them to the washing machine, minimizing the spread of contaminants through your home.
-
Wash on High Heat: Use a standard laundry detergent and wash the items in the hottest water the fabric can safely tolerate.
-
Dry Thoroughly: Tumble dry on a high heat setting, as the sustained heat helps kill any remaining pathogens.
-
Use Sunlight for Non-Washables: For delicate items that cannot be washed, leaving them in direct sunlight for several hours can help disinfect them, as UV light has natural germicidal properties.
Carpets and Upholstered Furniture
Soft surfaces like carpets and furniture can harbor unseen bacteria and viruses from rodent urine and droppings. After vacuuming up all visible debris (using a vacuum with a HEPA filter), you must deep clean and disinfect. For carpets, use a steam cleaner with a commercial-grade disinfecting shampoo. For sofas and chairs, apply a disinfectant spray specifically designed for upholstery. Always test any cleaner on a small, hidden area first to ensure it doesn’t cause discoloration or damage.
Attics, Crawlspaces, and Contaminated Insulation
These areas represent the highest risk during cleanup. Insulation, once contaminated by rodent nests, urine, and feces, cannot be effectively sanitized. The material is porous, trapping dangerous pathogens that can easily become airborne if disturbed. Attempting to remove it without proper personal protective equipment (PPE) and specialized tools is extremely hazardous.
Professionals use commercial-grade HEPA vacuums and follow strict protocols to safely remove and dispose of soiled insulation. Given the serious health risks, this part of cleaning after rodent infestation is best left to certified experts. For severe attic or crawlspace infestations, contact a professional for safe removal and sanitation to ensure your home is truly clean and your family is protected.
Eliminating Lingering Odors and Stains After Cleanup
You’ve disinfected surfaces and removed all visible signs of rodents, but a persistent, musty smell remains. This unpleasant odor is a common problem after an infestation, typically caused by urine that has soaked deep into porous materials like wood, drywall, insulation, or concrete. Simply masking the smell with air fresheners is a temporary fix that won’t solve the underlying issue. Proper odor elimination is the final, essential step to fully reclaim your home and restore its clean, safe environment.
Pinpointing the Odor’s Source
To eliminate the smell, you must first find its source. The odor will be strongest near former nesting areas, runways, or hidden urine spots. Thoroughly inspect dark, undisturbed areas like wall voids, crawl spaces, attics, and beneath floorboards. For a professional approach, use a UV blacklight in a darkened room; rodent urine will glow, revealing hidden stains on carpets, baseboards, and other surfaces that are invisible to the naked eye.
Eradicate Odors with Enzymatic Cleaners
Standard household cleaners won’t break down the uric acid crystals in rodent urine, which are the root cause of the lingering smell. For complete odor eradication, you need an enzyme-based (or enzymatic) cleaner. These powerful solutions use beneficial bacteria to produce enzymes that break down the organic proteins in urine, feces, and other biological matter, permanently destroying the source of the odor. This step is a non-negotiable part of a comprehensive cleaning after rodent infestation. Always follow the product’s instructions for safe and effective use on different materials.
Natural Methods for a Final Refresh
After treating the source, you can use natural solutions to absorb any remaining airborne odors and freshen the space. These methods are safe, effective, and work best in conjunction with deep cleaning.
-
Baking Soda: Place open boxes or shallow bowls of baking soda in affected rooms to absorb odors from the air.
-
White Vinegar: Set out bowls of white vinegar for a day or two. Vinegar is excellent at neutralizing stubborn smells.
-
Ventilation: Open windows and use fans to circulate fresh air throughout the space, helping to air out any final traces of the infestation.
Successfully completing the cleaning after rodent infestation is a major accomplishment. However, if odors persist or the contamination was widespread, professional intervention may be necessary to guarantee your home is fully restored. For comprehensive pest eradication and sanitation support, trust the experts at Mosquito Assassin to safeguard your home and family.
When DIY Isn’t Enough: Signs You Need a Professional
While the steps outlined in this guide are effective for minor incidents, a large-scale or long-term rodent problem poses significant health risks that demand professional intervention. Attempting a major cleanup without the right training or equipment can expose your family to dangerous airborne pathogens. Knowing when to call for expert help is the most important step in safeguarding your home and health.
Indicators of a Heavy Infestation
If you notice any of the following signs, the problem has likely grown beyond a simple DIY project. These are clear signals that you need professional assistance for a safe and thorough cleanup:
-
Widespread Droppings: You find droppings and urine stains in multiple rooms, across different floors, or inside cabinets and pantries.
-
Visible Pathways: Dark, greasy rub marks are visible along walls, baseboards, and pipes where rodents have traveled repeatedly.
-
Overwhelming Odor: A strong, musty smell of ammonia from urine is noticeable throughout the home and doesn’t fade with ventilation.
-
HVAC Contamination: You suspect or have found evidence of rodents nesting or leaving waste inside your air ducts or HVAC system.
The Mosquito Assassin Advantage: Cleanup and Exclusion
When facing a severe rodent problem, you need a comprehensive solution, not just a surface-level clean. A professional service for cleaning after rodent infestation is designed to eliminate the threat completely and protect your family. Our certified technicians arrive with commercial-grade Personal Protective Equipment (PPE), HEPA-filtered vacuums, and EPA-approved virucidal disinfectants to neutralize pathogens safely.
We don’t just clean; we restore your peace of mind. Our team is trained to safely remove and dispose of contaminated materials, such as soiled insulation in your attic or crawlspace. But our work isn’t finished until we complete the most critical step: exclusion. We conduct a thorough inspection to identify and professionally seal every potential entry point, from foundation cracks to roofline gaps. This proven process ensures that once we handle the cleanup, rodents can’t get back in to start the cycle all over again.
Don’t risk your health on a hazardous cleanup. Contact the experts at Mosquito Assassin for a dependable and complete solution.
Reclaim Your Home with Professional Rodent Cleanup
Tackling the aftermath of a rodent infestation is a serious task that demands caution and the right approach. As we’ve covered, the key takeaways are clear: always prioritize your safety with proper protective gear, follow a meticulous disinfection process to eliminate dangerous pathogens, and understand when a situation is too hazardous for a DIY approach. A thorough cleaning after rodent infestation is not just about appearances, it’s about fundamentally safeguarding the health of everyone in your home. These steps are critical for restoring a safe living environment.
When the risks are high and the job is extensive, the safest choice is to call in the professionals. At Mosquito Assassin, we provide the expertise and equipment to handle the job correctly and safely. As a Locally Owned and Operated team serving communities across PA & OH, we are dedicated to protecting our neighbors with Family-Safe Treatments and a rock-solid Pest-Free Guarantee. Don’t leave your family’s well-being to chance. Schedule a professional rodent cleanup and exclusion service today!
Frequently Asked Questions About Cleaning After Rodents
What are the health risks of cleaning up rodent droppings myself?
Rodent droppings and urine can transmit dangerous diseases like Hantavirus, Salmonella, and Leptospirosis. The primary risk is inhaling airborne virus particles that get stirred up by improper cleaning methods like sweeping or vacuuming. Direct contact with contaminated surfaces can also lead to infection. Safeguarding your family’s health is the top priority, which is why professional cleaning after rodent infestation is the most reliable way to eliminate these serious threats and ensure the job is done safely.
I already vacuumed up the droppings. What should I do now?
Using a standard vacuum can aerosolize dangerous virus particles, spreading them throughout the air. If you’ve already done this, take the vacuum outside immediately. While wearing gloves and a respiratory mask, carefully remove the bag or empty the canister into a sealed plastic bag for disposal. Thoroughly disinfect the entire vacuum cleaner with a bleach solution or an EPA-registered disinfectant. Monitor the area for any missed contamination and be aware of any flu-like symptoms in the coming weeks.
How can I tell if the rodents are completely gone before I start cleaning?
Before beginning any cleanup, you must confirm the infestation has been eliminated. Look for the absence of fresh signs for several days, such as new droppings (which are dark and soft), recent gnaw marks, or tracks in dusty corners. A proven method is to clean a small, visible area and check it daily. If no new rodent activity appears after three to five days, it is a strong indicator that they are gone and you can proceed with a full cleaning.
Is bleach the only thing that will kill the germs in mouse droppings?
While a 1:10 bleach-to-water solution is highly effective and recommended by the CDC, it is not your only option. Any commercial, EPA-registered disinfectant that is rated to kill viruses will also work effectively. The critical step is to follow the product’s directions for contact time, the contaminated surface must remain wet with the disinfectant for the specified period to ensure all harmful pathogens are neutralized. This guarantees a truly sanitized and safe environment for your family.
How long do viruses like Hantavirus survive in the environment?
The survival time for Hantavirus depends on environmental conditions. In dried rodent urine, droppings, or saliva, the virus can remain infectious for two to three days at normal room temperature. Its lifespan can be longer in cool, dark, and undisturbed areas like basements or crawlspaces. Direct sunlight and UV exposure help deactivate the virus more quickly, but you should always assume that any droppings you find could still be infectious and take proper precautions.
Can the smell of dead rodents in walls be removed professionally?
Yes, absolutely. A lingering odor from a dead rodent is a difficult problem that requires a professional solution for complete eradication. Our certified technicians have the tools and expertise to locate and remove the carcass, even from inaccessible areas like wall voids or attics. We then use commercial-grade deodorizers and fogging treatments to neutralize the odor at its source, permanently eliminating the smell and restoring fresh air to your home.